


PART1DC Circuit
Experiment 4 : Wheatstone Bridge Circuit
Theory
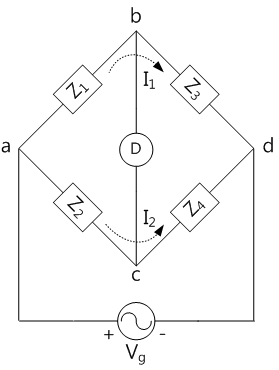
Bridge circuit is used widely in measurements of R, L, C or frequency. Fig. 1-12 shows bridge circuit. In DC Wheatstone bridge where each arm is pure resistance, a galvanometer is used as a detector. When the current flowing on D becomes “0”, the bridge is in balance. When in balance, the potential difference between the both ends of D becomes “0”, the current does not flow between b and C of Fig. 1-12. The voltage drop between a and b should be same as the voltage drop between a and c in the size and in the phase. That is, it meets the condition below.
From these two formulae, the relationship between each impedance can be made.
This is bridge’s condition of balance. If the current is detected at D(Unbalancing), this means outer force(circumstance) is applied and this is used in detecting circuits.
Experiment Process
tab1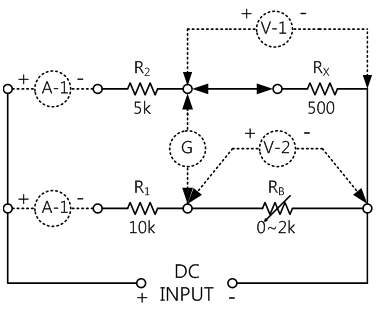
Experiment 1-4.1 DC Wheatstone Bridge (In Circuit-5 of M-01, compose a circuit as in Fig. 1-13.)
1.Connection
1.Circuit Connection
In Circuit-5 of M01, connect between 5f terminal and 5g terminal, between 5p terminal and 5r terminal with yellow lines.
2.Power Connection
Connect between V1 terminal of Variable Power on the left of M01 board and (+)(0~10V) terminal of Circuit-5 with red line, and between com terminal and (-) (0~10V) terminal with black line.
3.Galvanometer Connection
Connect between 5i terminal of Circuit-5 and 4c terminal of Circuit-4 with red line, and between 5o terminal of Circuit-5 and 4d terminal of Circuit-4 with black line.
4.Voltmeter Connection
V-1 Connection
Connect between Signal Input A+ terminal of front panel and 5h terminal of Circuit-5 with red line, and between A- terminal and 5l terminal with black line.
V-2 Connection
Connect between Signal Input B+ terminal of front panel and 5q terminal of Circuit-5 with red line, and between B- terminal and 5l terminal with black line.
2.Wiring Diagram
flash
Voltage Measurement
flash
Current Measurement
flash
3.Measurement
- 1Choose variable powerat the left menu of Touch LCD panel.
- 2Choose 3 CH DC tab, click at DC Voltage V1 to set up 10V, and click , then the output of DC 10V at V1 will input to the circuit.
- [Galvanometer Measurement]
3 Adjust BALANCE ADF of Circuit-5 so that the galvanometer of Circuit-4 indicates 0. - [Voltage Measurement]
4 Choose signal inputat the left menu of Touch LCD panel, choose Volt & Ampere Meter tab and click , , at CH A, CH B each.Record the measured values of CH A and CH B in Fig. 1-13(R2 Connecting) of table 1-5. Here, CH A is voltage V-1, and CH B is voltage V-2.
- [Current Measurement]
5 A-1 Current MeasurementRemove the line between 5f terminal and 5g terminal of Circuit-5 on M01 board.
Connect between the current measuring terminal(mA) of separate Digital Multimeter and 5f terminal, and between Com terminal and 5g terminal with black line.
Record the current value(A-1) measured from separate Digital Multimeter to Fig. 1-13(R2 Connecting) of table 1-5.
- 6A-2 Current Measurement
Connect between 5f terminal and 5g terminal with yellow line again and remove the yellow line between 5p terminal and 5r terminal.
Connect between the current measuring terminal(mA) of separate Digital Multimeter and 5p terminal, and between Com terminal and 5r terminal with black lin
Record the current value(A-2) measured from separate Digital Multimeter to Fig. 1-13(R2 Connecting) of table 1-5.
- [Resistance Measurement]
7 Remove the power source connected to (+)-(-) of Circuit-5 and the Galvanometer connected to 5i terminal and 5o terminal. - 8Choose dmm at the left menu of Touch LCD panel and click .
Connect between High terminal of Multimeter on the front panel and 5q terminal of Circuit-5 with red line, and between Low terminal and 5n terminal of Circuit-5 with black line, and record the measured value in Rb value of Fig. 1-13(R2 Connecting) of table 1-5.(Rb=R6 Measurement)
- 9Instead of resistance R2, use R3 and R4 and connect 5k terminal and 5m terminal to compose the circuit, repeat Measurement 1)~8), and record the result to Fig. 1-13(R3 Connecting) of table 1-5
4.Calculation
1. Calculate Rx(R6) by the formula and record the result to Fig. 1-13(R2 Connecting)and Fig. 1-12(R2 Connecting) of table 1-5, and compare it with the measured value
(R2 Connecting) Formula 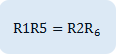 (R5=Rx)
R3 Connecting) Formula 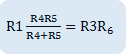 (R4=Rx)
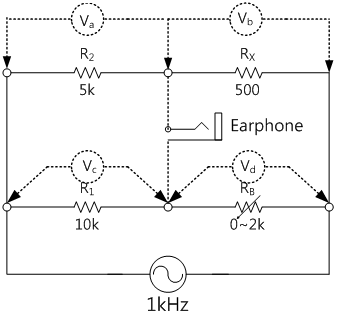
Experiment 1-4.2 AC Wheatstone Bridge (In Circuit-5 of M-01, compose a circuit as in Fig. 1-14.)
1.Connection
1.Circuit Connection
In Circuit-5 of M01, connect between 5f terminal and 5g terminal, between 5e terminal and 5g terminal, and between 5p terminal and 5r terminal with yellow lines.
2.Function Generator Connection
Connect between A+ terminal of Signal Output on the front panel and (+)(0~10V) panel of Circuit-5 with red line, and between A- terminal and (-)(0~10V) terminal with black line.
3.Voltmeter Connection
Va Connection
Connect between A+ terminal of Signal Input CH A on the front panel and 5b terminal of Circuit-5 with red line, and between A- terminal and 5f terminal with black line.
Vb Connection
Connect between B+ terminal of Signal Input CH B on the front panel and 5h terminal of Circuit-5 with red line, and between B- terminal and 5l terminal with black line.
Vc Connection결선
Connect between A+ terminal of Signal Input CH A on the front panel and 5c terminal of Circuit-5 with red line, and between A- terminal and 5p terminal with black line.
Vd Connection
Connect between B+ terminal of Signal Input CH B on the front panel and 5q terminal of Circuit-5 with red line, and between B- terminal and 5n terminal with black line.
2.Wiring Diagram
Va Connection and Vb Connection
flash
Connection and Vd Connection
flash
3.Measurement
- 1Choose analog outputat the left menu of Touch LCD panel.
- 2Choose Function Generator tab, click at Amplitude Range to set up 10Vp-p and click at Frequency to set up 1,000Hz(1kHz).
If you click , 10Vp-p 1kHz will be output from the Signal Output terminal of front panel.
- 3Connect earphones to 5i terminal and 5o terminal and adjust Rb so that the sound does not be heard. (Make it In Balance status)
- 4Do as <Va >, < Vb > in Connection>Voltmeter Connection, choose analog_inputat the left menu of Touch LCD panel, choose Volt & Ampere Meter tab and click , and for CH A and CH B each.
Record the measured values of CH A and CH B in Fig. 1-13(R2 Connecting) of table 1-5. Here, CH A is voltage V-1, and CH B is voltage V-2.
- 5Do as <Vc>, <Vd> in Connection>Voltmeter Connection and record the measured values of CH A, CH B to Fig. 1-14(R2 Connecting) of table 1-6. Here, CH A is voltage Vc, and CH B is voltage Vd.
- 6Instead of resistance R2, use R3 and R4 and connect 5k terminal and 5m terminal to compose the circuit, repeat Measurement 3)~6), and record the result to Fig. 1-14(R3 Connecting) of table 1-6.
Experiment Result Report
1. Experiment Result Table
2. Review and Explanation
1) Calculate Rx(R6) according to the formula, record the result in the table and compare it with the measured value.
(R2 Connecting) Formula (R5=Rx)
(R3 Connecting) Formula (R4=Rx)